Crane Safety Toolbox Talk - Safety Checklist & Resources
Sept. 17, 2021
Cranes are some of the most versatile and important pieces of equipment on a construction job site. Cranes can also be the most dangerous risk - it is important to understand proper safety procedures and training.

Cranes Are Often The Most Powerful Equipment On The Job
Cranes are often the largest and most powerful equipment on job sites - their sheer size and strength enable them to lift and maneuver very heavy loads, but these traits also make cranes larger potential hazards. Cranes are complex machines that require proper safety training to ensure the well-being of the construction crew and bystanders.
About 40 construction workers die each year on the job from crane accidents, according to research published by the BLS and OSHA. As a result, cranes above 2,000 pounds are regulated, and operators must be certificated by the National Commission for the Certification of Crane Operators (NCCCO). Companies operating cranes are held legally liable for harm and damage inflicted upon workers, bystanders and structures - as a result, many companies buy specific insurance coverage for cranes.
Crane Safety Toolbox Talk
Checklist of critical items to monitor before moving a load
- Check first for overhead obstructions such as power lines, trees, structures, etc.
- Verify the load rating for slings, chains and straps meet or exceed the lift’s rating. All slings, straps and chains must have tags identifying the safe working load.
- Understand potential pinching and crushing hazards around the crane and the load landing area. Mark each of these areas with paint or chalk, so they are visible to the construction crew and bystanders.
- Barricade the swing radius surrounding the crane to ensure unauthorized persons do not knowingly or unknowingly enter the pinch point areas.
- Check for proper balance of the load and that all items are clear of the path of travel.
- Follow a lift plan for all critical lifts - make copies of the plan and distribute them to the persons on the job site. Changes and modifications to the plan should be communicated to all relevant team members.
Checklist of critical items to monitor while moving a load
- Never allow crew or bystanders to travel or work beneath a suspended load.
- Keep all persons a minimum safe distance away from the crane while a load is being raised, moved, or lowered.
- Crane operators must keep their focus and attention on the crane when it is in motion - the operator should not talk on the phone or text for unrelated matters.
- A trained signalman is required and the signalman and operator must use common industry hand signals. The crane operator and signalman must be able to see each other and communicate at all times.
- Only one person should operate a lift or give signals at a time unless it is required due to a specific hazardous situation. This prevents conflicting messages that could cause confusion.
- Make use of an air horn to signal a lift is in motion to alert personnel of what’s overhead. It should be loud enough to also alert persons in the general vicinity who might not be watching the crane.
- Never raise a load higher than necessary.
- Never leave a load suspended in the air unattended.
Toolbox Talk Outline
- Discuss the current task to be done.
- Review checklists above.
- Discus safety issues including environment, hazards, use of personnel protective equipment (PPE), first aid and medical support and emergency procedures.
- Provide time for feedback and questions from the job site crew.
- You can review or quiz members with a brief test to verify everyone understands the toolbox talk guidelines.
Safety Equipment - Signs/Stickers, Air Horns & Lights
Safety Signs/Stickers
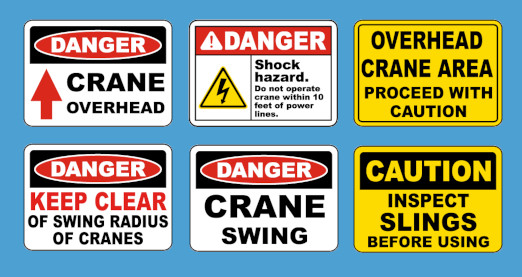
Safety signs and stickers are helpful and effective ways to communicate to the crew and bystanders the risks of the job site environment. OSHA / ANSI have guidelines for visual signs that should be used for cranes at job sites.
Typically crane warning labels are made from adhesive-backed vinyl, UL polyester, rust-free aluminum or plastic. Resources such as SafetySign.com and Amazon sell crane signs and stickers.
You should consider bilingual signs for areas that may have more than one common language spoken.
Sample Safety Signs

Source: SafetySign.com
Note: Equipment Radar is not affiliated with or sponsored by SafetySign.com.
Air Horns / Audible Alarm Sirens
Prior to lifting, use an air horn (or audible alarm siren) or radio-equipped runner to notify all persons nearby to raise awareness and clear the path. Upon completion of the lift, notify persons nearby again with an "all clear" signal. Different horn blasts should be used for prior to lift, "all clear" and finish.
Air horns and audible cues should be used because not all persons nearby may have the crane in their line of sight.
Safety Lights
Lighting illuminating the crane and moving parts is also very important because it helps distinguish the crane from its surroundings. Natural lighting can change based on time of day and weather, and it could become difficult to see the crane without lighting.
Warning spotlights can be placed around the crane so persons traveling within the crane vicinity become aware of the equipment and risks.
Transportation
Cranes are large, and oftentimes they require a separate plan to maneuver and set up the crane at the job site. This is especially important if the crane must navigate through a crowded city or complicated industrial job site.
Study the intended path first and carefully measure path dimensions to make sure that the crane can pass safely. Be sure to account for some extra margin around turns and complicated angles.
Often it is helpful to have spotters on either side of the crane when it maneuvers around corners. The driver and spotters should always maintain constant visual or audible contact.
Many cranes require oversized loads warnings on the exterior - make sure you follow all roadway and local laws. Often this requires adding bright color flags and signs to the transportation vehicle to help other drivers see the vehicle. Some oversized loads require pre-clearance or police escorts.
Some cranes may exceed local weight limits - this is especially important to check if your route requires passing over bridges and elevated roads.
Lift Plan
A lift plan is similar to an architectural drawing of a building - both require thought and design to achieve a final product.
A lift plan is typically put together by an engineer with crane experience, and it includes many job-specific considerations and items, including:
- Weight of load, and lift capability of the crane
- Location of load's center of gravity
- Maximum dimensions of load
- Location and quantity of approved lifting lugs / lifting points
- Rigging gear required for the specific lifting points and center of gravity
- Height restrictions and known obstacles
- Risk assessment, and items to mitigate risks
- Method statement (process, procedure, engineering data, costing, public and site impact, and preparation requirements)
The lift plan should be distributed to all persons involved with the crane. Lift plans often can change, so it is important to re-distribute the most current version to all team members so everyone is referencing the same plans.
OSHA Crane Safety Hand Signals
Crane operators and signal persons must use specific hand signals to communicate visually with each other. OSHA has specified industry guidelines for hand signals that should be used. Below we have included the most common crane hand signals.

With arm extended horizontally to the side, palm down, arm is swung back and forth.

With both arms extended horizontally to the side, palms down, arms are swung back and forth.

With upper arm extended to the side, forearm and index finger pointing straight up, hand and finger make small circles.

With arm extended horizontally to the side, thumb points up with other fingers closed.

With arm extended horizontally, index finger points in direction that boom is to swing.

With hands to the front at waist level, thumbs point at each other with other fingers closed.

With arm extended horizontally to the side and thumb pointing up, fingers open and close while load movement is desired.

Hands held together at waist level.

With arm and index finger pointing down, hand and finger make small circles.

With arm extended horizontally to the side, thumb points down with other fingers closed.

With hands to the front at waist level, thumbs point outward with other fingers closed.

With all fingers pointing up, arm is extended horizontally out and back to make a pushing motion in the direction of travel.

With arm extended horizontally to the side and thumb pointing down, fingers open and close while load movement is desired.

A hand is placed in front of the hand that is giving the action signal.

With arm bent at elbow and forearm vertical, elbow is tapped with other hand. Then regular signal is used to indicate desired action.

Rotate fists around each other in front of body; direction of rotation away from body indicates travel forward; rotation towards body indicates travel backward

A hand taps on top of the head. Then regular signal is given to indicate desired action.

Indicate track to be locked by raising fist on that side. Rotate other fist in front of body in direction that other track is to travel.

With palm up, fingers closed and thumb pointing in direction of motion, hand is jerked horizontally in direction trolley is to travel.
Source: Full OSHA Crane Guidelines
Crane Rental
Many crane rental companies will be able to provide you with basic safety resources, a list of reputable and licensed crane operators, as well as transportation to and from the job. Also, many crane rental companies can create lift plan for you, or they can provide a referral. Every job is different, so it is important to speak with your crane rental company first.
Resources
12 types of cranes
OSHA Crane, Derrick and Hoist Safety
Crane safety video
Find Similar Articles By Topic
#cranes #material handling #checklists #construction #toolbox talks


